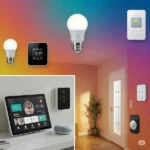
Home Assistant Devices
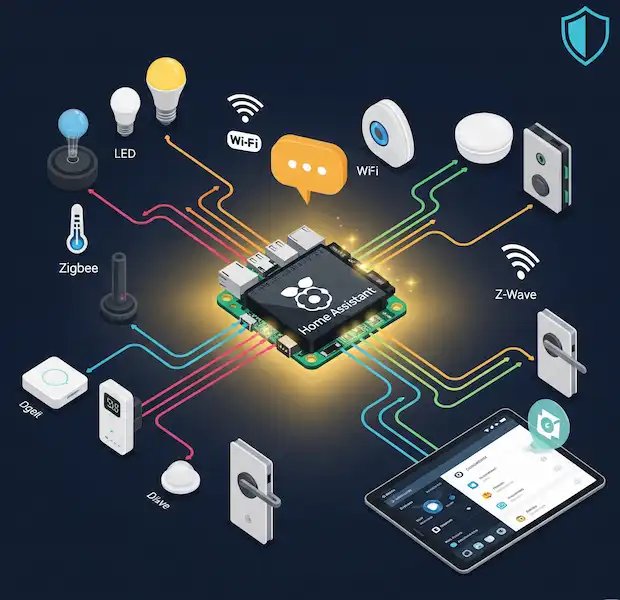
Home Assistant stands out in the smart home landscape as a powerful, open-source platform that prioritizes local control, privacy, and unparalleled customization. Unlike commercial ecosystems from Amazon, Google, or Apple, Home Assistant isn’t a single “device” you buy off the shelf. Instead, it’s a software solution that runs on various hardware, effectively turning that hardware into your personalized smart home hub.
Let’s delve into the various components and how Home Assistant leverages or interacts with voice assistants, smart speakers, smart displays, and its core function as a smart home hub.
Home Assistant Devices: A Deep Dive
Home Assistant’s flexibility means it can run on a variety of hardware, and its integrations extend to encompass virtually any smart device.
Home Assistant as a Smart Home Hub
At its core, Home Assistant is a smart home hub. It’s the central brain that connects, automates, and manages all your smart devices.
- Dedicated Hardware (Official/Recommended):
- Home Assistant Green: This is a plug-and-play solution, designed for ease of use. It comes with Home Assistant pre-installed, making it ideal for those who want a simpler entry into the ecosystem without delving into complex setup. It supports adding USB dongles for Zigbee, Z-Wave, and Thread (with Home Assistant Connect ZBT-1).
- Home Assistant Yellow: A more modular option, allowing users to add more RAM, storage (NVMe SSD), and often comes with built-in Zigbee and Matter-over-Thread support. It’s for users who want more expandability and performance.
- Home Assistant Voice Preview Edition: While primarily a voice assistant device (discussed below), it’s built to deeply integrate with Home Assistant as a hub for its voice capabilities, offering local processing.
- DIY Hardware:
- Raspberry Pi: A very popular and affordable choice for running Home Assistant, especially for beginners. It’s compact and energy-efficient.
- Mini PCs/NUCs: For larger, more complex smart homes or those desiring more processing power for local AI models, a mini PC or Network Attached Storage (NAS) device can run Home Assistant (e.g., Home Assistant OS, Home Assistant Container, Home Assistant Supervised).
- Old Laptops/Desktops: You can repurpose older computers to serve as your Home Assistant server, though energy consumption might be higher.
Home Assistant Voice Assistant (Assist)
Home Assistant has its own built-in voice assistant called “Assist.” This is a major step towards truly local and private voice control.
- Home Assistant Voice Preview Edition (HA Voice PE): This is the official hardware designed specifically for Assist. It features dedicated audio processing, dual microphones, and is optimized for local speech-to-text and text-to-speech. It focuses on privacy by keeping your voice commands within your home.
- Third-Party Microphones/Speakers: You can connect various USB microphones and speakers to your Home Assistant server (or satellite devices like ESP32-S3 boards running ESPHome) to create your own voice assistant endpoints around the house.
- Integration with Commercial Voice Assistants: Home Assistant can integrate with existing Amazon Alexa and Google Assistant devices (often requiring Home Assistant Cloud for seamless cloud-based interaction, though local methods exist via Emulated Hue or Matter Bridge). This means you can use your Echo or Nest devices to control Home Assistant entities.
Home Assistant Smart Speakers
While Home Assistant doesn’t manufacture its own full-fledged smart speakers for media playback, its voice assistant capabilities can be extended to various devices.
- HA Voice PE: As mentioned, this is designed for voice commands and feedback, but can also output audio to external speakers for better sound quality.
- ESPHome-based Speakers: DIY enthusiasts can build custom smart speakers using ESPHome on boards like the ESP32-S3-BOX, integrating them directly with Home Assistant for voice commands and audio playback.
- Existing Smart Speakers (via Integration): Amazon Echo, Google Nest, and Sonos speakers can all be integrated with Home Assistant. This allows Home Assistant to:
- Control them: Play music, adjust volume, etc.
- Be controlled by them: Use voice commands via Alexa or Google Assistant to trigger Home Assistant automations.
Home Assistant Smart Displays
Home Assistant doesn’t have its own dedicated smart display hardware in the same vein as an Echo Show or Nest Hub, but it excels at providing a customized dashboard experience that can be displayed on various screens.
- Tablets/Old Phones: One of the most popular uses is to mount an old tablet or phone on a wall to serve as a dedicated Home Assistant dashboard. This offers a fully customizable interface for controlling devices, viewing cameras, and monitoring data.
- Raspberry Pi with a Touchscreen: DIY smart displays can be created using a Raspberry Pi connected to a touchscreen display.
- Existing Smart Displays (Limited Integration): While you can’t “run” Home Assistant directly on an Echo Show or Nest Hub’s native interface, Home Assistant can:
- Cast content: Display dashboards or camera feeds to Google Nest Hubs via Google Cast integration.
- Be controlled: Use Alexa or Google Assistant on these displays to control Home Assistant devices.
Comparison Chart of Home Assistant Devices/Capabilities
| Feature/Device Type | Home Assistant Hub (Green/Yellow/DIY) | Home Assistant Voice Preview Edition | ESPHome DIY Voice/Speaker | Existing Alexa/Google Smart Speaker/Display |
|---|---|---|---|---|
| Primary Function | Central smart home control & automation | Local voice control for HA | Customizable voice/audio endpoint | Cloud voice assistant, media, display |
| Core Software | Home Assistant OS/Container/Supervised | ESPHome (firmware for HA Assist) | ESPHome | Proprietary (Amazon/Google) |
| Voice Assistant | Assist (via integrations/satellites) | Home Assistant Assist | Home Assistant Assist | Alexa / Google Assistant |
| Local Processing | High (for automations, device control) | High (voice-to-text, text-to-speech) | High (voice-to-text, text-to-speech) | Low (primarily cloud for voice commands) |
| Setup Difficulty | Moderate to Advanced | Easy (plug-and-play for HA) | Advanced (DIY firmware flashing) | Easy (app-based setup) |
| Privacy | Excellent (user controls data) | Excellent (voice stays local) | Excellent (user controls data) | Moderate to Low (cloud-based processing) |
| Hardware Cost | Varies ($50 – $400+) | Mid-range ($50-$100) | Low ($10 – $50 per device) | Low to High (varies by model) |
| Flexibility | Maximum (integrations, automations) | High (custom wake words, personalities) | Very High (hardware/software) | Low (limited by manufacturer’s ecosystem) |
| Connectivity | Wi-Fi, Ethernet, (Zigbee/Z-Wave/Thread via dongles) | Wi-Fi, Bluetooth | Wi-Fi, Bluetooth | Wi-Fi, Bluetooth, sometimes Zigbee/Thread |
Pros and Cons of Using Home Assistant Devices
Pros:
- Unmatched Customization: Home Assistant Devices allows you to automate virtually anything, from simple light schedules to complex, conditional routines involving multiple sensors and devices. You have full control over your smart home logic.
- Extensive Device Compatibility: It supports thousands of devices and integrations across almost every protocol (Wi-Fi, Zigbee, Z-Wave, Bluetooth, Matter, Thread, MQTT, REST APIs, etc.), bringing disparate brands under one unified control system.
- Local Control & Privacy: This is a huge differentiator. Home Assistant Devices primarily runs locally on your hardware, meaning your data stays in your home. Your automations continue to function even if your internet goes down, and you’re not reliant on cloud services that could be discontinued or collect your data. Assist (Home Assistant’s voice assistant) is designed for local processing of voice commands.
- Cost-Effective: The software itself is free and open-source. While you need to invest in hardware (which can be a cheap Raspberry Pi or a more powerful mini-PC), it often ends up being more economical than investing heavily in a single commercial ecosystem, especially when considering the range of compatible devices.
- Active Community: Home Assistant boasts a massive and very active community of users and developers. This means abundant tutorials, troubleshooting help, custom integrations, and constant improvement of the platform.
- Future-Proofing: Being open-source, Home Assistant is adaptable to new technologies (like Matter and Thread) and isn’t tied to the whims of a single company’s product roadmap.
Cons:
- Steep Learning Curve: This is the biggest hurdle. Home Assistant Devices can be complex to set up, configure, and maintain, especially for users new to Linux, networking, or YAML configuration files. It requires a willingness to learn and troubleshoot.
- Hardware Dependency: You need to provide your own hardware (e.g., Raspberry Pi, mini PC), which adds an initial setup step and potential troubleshooting.
- No “Official” All-in-One Device (Historically): While Home Assistant Green and Yellow aim to simplify this, there hasn’t traditionally been a single, integrated “Home Assistant device” that does everything out of the box (like an Echo Show combines a hub, speaker, display, and voice assistant).
- Updates Can Be Tricky: Frequent updates bring new features but can sometimes introduce breaking changes or require manual intervention, especially if you have highly customized setups.
- No Centralized Customer Support: As an open-source project, official customer support is not available. You rely on the community for help.
- Voice Assistant (Assist) Maturity: While Assist is rapidly improving and offers excellent privacy, it might not yet have the full breadth of “general knowledge” capabilities or polished conversational flow that Alexa or Google Assistant provide. Its strength lies in smart home control.
Tips for a Successful Home Assistant Experience
Explore and use these tips for using home assistant devices and you will have better results with your home network.
- Start Small, Grow Big: Don’t try to automate your entire house on day one. Begin by integrating a few simple devices (e.g., smart lights, a sensor) and creating basic automations. Gradually expand as you gain confidence.
- Choose Your Hardware Wisely:
- Beginners: Consider Home Assistant Green for a simpler plug-and-play experience.
- Intermediate/Advanced: A Raspberry Pi 4 (or newer) is a solid choice. For more demanding setups or local AI voice processing, a mini PC (e.g., Intel NUC) is better. Ensure you use a reliable SSD for storage, not an SD card, to prevent corruption and improve performance.
- Backup Regularly: Home Assistant offers robust backup options. Use them! This is crucial before major updates or making significant configuration changes.
- Join the Community: The Home Assistant community forums, Discord, and Reddit (r/homeassistant) are invaluable resources. Don’t be afraid to ask questions.
- Understand YAML (Eventually): While Home Assistant has a good UI for most tasks, understanding YAML (Yet Another Markup Language) will unlock its full potential for advanced automations and customizations.
- Embrace Local Control: Whenever possible, choose devices that can be controlled locally (Zigbee, Z-Wave, Matter, Thread, or Wi-Fi devices with local APIs) rather than relying solely on cloud integrations. This enhances privacy, reliability, and speed.
- Prioritize Stability over Novelty: While it’s tempting to try every new integration, a stable and reliable smart home is often more valuable. Test new features in isolation if possible.
- Organize Your Configuration: As your setup grows, a well-organized configuration (using packages, separate YAML files for different domains/areas) will make it much easier to manage.
- Explore Add-ons and Integrations: The Home Assistant Add-on Store and vast integration library offer immense possibilities. Look into tools like Node-RED for visual automation, or ESPHome for custom device creation.
Additional helpful information
Connect your smart home hub to Alexa or Google Home – Connect Smart Home Hub to Alexa & Google Home
Details about smart speaker devices – Smart Speaker Devices: Features, Comparison & Tips